Tuesday 18 December 2018

How to Convert an E-Learning Course into a PowerPoint File

convert e-learning to PowerPoint

The other day someone asked how to convert their Storyline course into a PowerPoint presentation. PowerPoint and Storyline look similar but they are two separate applications. You can import PowerPoint slides into Storyline, which makes it easy to convert some existing PowerPoint content into an interactive e-learning course. However, PowerPoint doesn’t offer a way to import Storyline files.

With that said, there are some ways to convert your Storyline course content into a format you can bring into PowerPoint.

Setting Expectations for PowerPoint Conversion

One of the reasons people like to convert the Storyline content to PowerPoint is so they have a presentation version of the course that they can share with other presenters. If this is something you need to do, I’ll share a few ideas, but you do need to understand that there are some constraints.

  • Storyline content is usually interactive with triggers showing layers and object state changes. PowerPoint presentations can be interactive, but they tend to be linear presentations of content. So it’s not an apples-to-apples conversion.
  • Whatever you export from Storyline will not be interactive. It’ll either be a video or series of images. That means you can’t isolate text boxes, shapes, or other media to edit on the PowerPoint slides. However, the opposite is true if you want to import your PowerPoint slides into Storyline.
  • You can simulate interactions in PowerPoint with hyperlinks to other slides using hotspots, but you can’t get the type of interactivity you get in Storyline. If you really need to retain the interactive elements, then it probably doesn’t make sense to convert to PowerPoint.

With that clear, let’s review a few ideas for getting your Storyline content into PowerPoint.

Save the Storyline Course as a Video

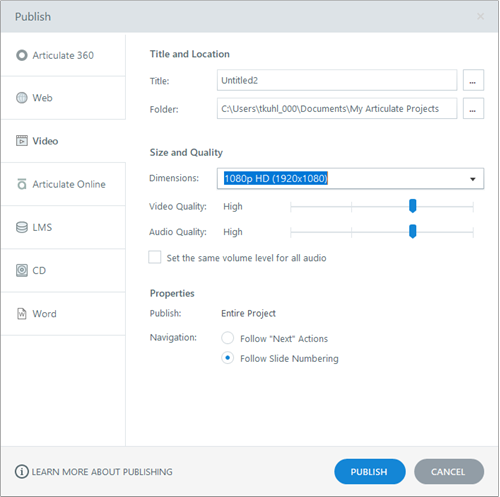
This is easy to do. Publish the Storyline file as an .MP4. As you can see in the image below, you have a number of resolution and quality settings. Once published the final output will be video.

Storyline to PowerPoint save as video

If you do have interactive elements in your Storyline course, you’ll need to set the triggers in Storyline to account for the change from interactive content to a linear video. That includes triggers that show layers and other objects that aren’t initially visible on the base slide.

As far as PowerPoint, all you need to do is insert the video onto a slide.

Screen Capture the Storyline Course and Save as Images

Open the published course in a browser and do a screen capture of the slides (just the slides and not the player). Here are a few options:

  • Capture the slides individually by going from slide-to-slide. This is a lot slower, but gives you more control when capturing.
  • Capture the course as a video and then output the video as images. Most video editing software has a way to export the video as a series of images. You’ll get an image for each frame. No need to capture at 30 frames per second (fps). I’d capture at a really low frame rate like 2-5 fps so you have less noise when pulling out the images you want.
  • Use a tool like Screen2Gif to create a .gif which consists of images and can usually be output as a series of images. It’s an easy process and the software is free.

Once you have the images you need, insert them into PowerPoint slides.

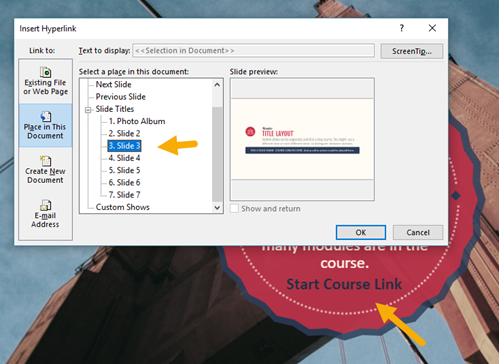
At that point, you can review the pictures and make edits. For example, where you have interactive instructions like the image below, you either add an interactive element to move to another slide or you add a colored shape to cover the instruction.

Storyline to PowerPoint add hyperlinks

I like working with images better than video because there’s more flexibility. Video gives you a single file, whereas it’s easier to work with multiple images. You have more control over some customization at the slide level and can more easily introduce interactive elements in PowerPoint.

The one thing you can’t get in the conversion is a PowerPoint slide with separated text, pictures, and shapes. It doesn’t work that way. However, if you need the content in a PowerPoint format, the options above should work.

In a follow up post, I’ll show how to make the video interactive and how to add interactive elements to the slide images.


Download the fully revised, free 63-page ebook: The Insider's Guide to Becoming a Rapid E-Learning Pro

Upcoming E-Learning Events

  • We're currently working on locations and dates for 2019.


Free E-Learning Resources

Want to learn more? Check out these articles and free resources in the community.

Here’s a great job board for elearning, instructional design, and training jobs

Participate in the weekly elearning challenges to sharpen your skills

Get your free PowerPoint templates and free graphics & stock images.

Lots of cool elearning examples to check out and find inspiration.

Getting Started? This elearning 101 series and the free e-books will help.


How to Convert an E-Learning Course into a PowerPoint File original post at The Rapid E-Learning Blog
Tuesday 11 December 2018

What to Know Before Building an E-Learning Course

Before committing resources to your course, it’s important to understand what type of e-learning course you need to build.

E-learning courses tend to be one of two types:

  • Information
  • Performance

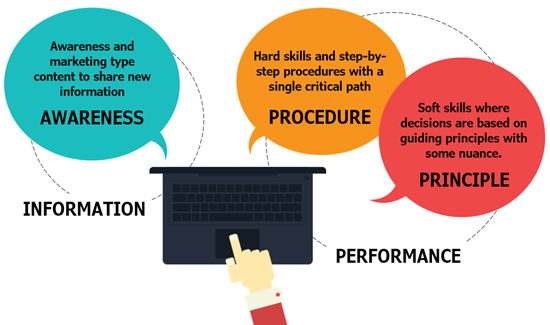
Information-based courses are more like explainer courses where the main objective is to share information or offer a linear explanation of the content. This is common for new initiatives where awareness is a key objective to the course. It’s also typical of a lot of compliance training that are less focused on changing behavior and more on awareness of key policies.

I tend to think of these less as courses, and more like awareness marketing content.

Performance based courses focus on changing performance or some sort of behavior. They’re tied to performance metrics where you can measure before and after changes.

When I meet with clients, I always try to determine what type of “course” they want to build. Information-based courses don’t always need to be built because they usually just regurgitate already existing content. So it may be a better option to refer them to existing content than it is to build a course. Performance-based courses usually take longer to build and require more resources.

Types of E-learning Courses

types of e-learning courses

Within that context, there are generally three types of courses:

  • Information: these courses share information with no performance expectations or changes in behavior. They’re more about awareness such as a company’s policy around certain issues.

Performance-based courses tend to be of two types:

  • Procedural: these courses are performance-based as they have a required sequence of events or procedures that need to be followed. This is typical of a lot of machine or software training. There’s not a lot of nuance to the training. There’s ten steps and everyone follows them exactly the same.
  • Principle: these courses are built around decisions that are more soft-skilled in nature. A procedural course has a clear critical path of steps. However, principle-based training is focused on general guidance or principles that are not always black and white. They’re nuanced where the application to each situation may be a bit unique.

Once you understand what type of course you need to build, you’ll be able to commit the appropriate resources. Information/awareness courses require fewer resources. Often, you’re just re-purposing existing content. Which begs the question why you’re building a course (but that’s a different blog post). Performance courses require more focus on measurable objectives, metrics to determine success, and a nuanced understanding of the content and real-world decisions the learner needs to make.


Download the fully revised, free 63-page ebook: The Insider's Guide to Becoming a Rapid E-Learning Pro

Upcoming E-Learning Events

  • We're currently working on locations and dates for 2019.


Free E-Learning Resources

Want to learn more? Check out these articles and free resources in the community.

Here’s a great job board for elearning, instructional design, and training jobs

Participate in the weekly elearning challenges to sharpen your skills

Get your free PowerPoint templates and free graphics & stock images.

Lots of cool elearning examples to check out and find inspiration.

Getting Started? This elearning 101 series and the free e-books will help.


What to Know Before Building an E-Learning Course original post at The Rapid E-Learning Blog
Tuesday 4 December 2018

Here’s a Free App to Compress Your Images

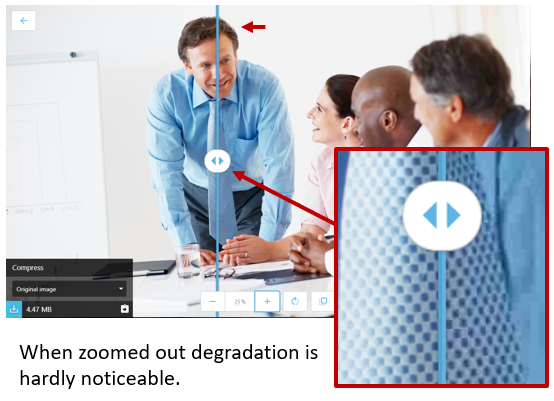
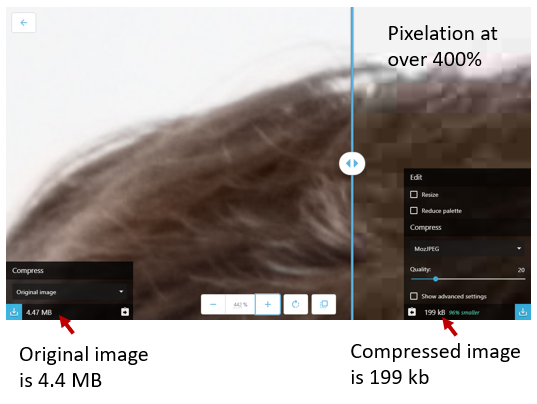
Squoosh.app is a free service from Google that compresses large images. What I like is being able to compare the before and after versions of images. It’s amazing to see how advanced the compression schemes are today. Some of the images I tested were compressed down over 90% and to the naked eye the degradation was negligible without zooming.

free image compression

As you can see above, the image size goes from 4.4 MB to just under 200 KB. That’s amazing. And the image below shows that the image quality is virtually the same for the naked eye.

You can learn more about the app here. Play around with the app and all of the different settings to see what you can do. Here’s a quick tutorial to see how it works.

Click here to view the tutorial on YouTube.

Final thought:

If you’re using Rise, you don’t really need to worry about compression. Rise will do the work for you. Here’s an example where I inserted the original image (4.4 MB) and the already compressed image (98 KB). In the published output, Rise compressed the original image to 100 KB and as you can see it looks great.

However, if you have a bunch of images to upload, having smaller images may speed up the time it takes to upload your files, especially if you have a slower network connection. Just something to keep in mind.

As a bonus, here’s another site that will do some image compression. And of course, you can always use something like ImageTuner to do batch conversions.


Download the fully revised, free 63-page ebook: The Insider's Guide to Becoming a Rapid E-Learning Pro

Upcoming E-Learning Events

  • We're currently working on locations and dates for 2019.


Free E-Learning Resources

Want to learn more? Check out these articles and free resources in the community.

Here’s a great job board for elearning, instructional design, and training jobs

Participate in the weekly elearning challenges to sharpen your skills

Get your free PowerPoint templates and free graphics & stock images.

Lots of cool elearning examples to check out and find inspiration.

Getting Started? This elearning 101 series and the free e-books will help.


Here’s a Free App to Compress Your Images original post at The Rapid E-Learning Blog
Tuesday 27 November 2018

E-learning Example & Tutorial: How to Fight a Bear and Live

e-learning example

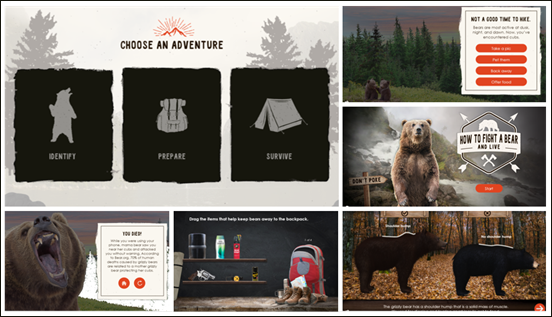
During the recent Articulate User event at Devlearn, Sarah Hodge from SlideSugar shared a really cool example that she built in Storyline. She incorporated the 3D models from PowerPoint to create videos that she added to her e-learning course.

Click here to view the e-learning example.

It’s a great example with some really neat ideas. She also included a quick tutorial to show how she built it. There’s also a free download for practice.

Here are a few key things that stood out to me:

  • 3D models are easy to work with in PowerPoint and when output as video, can add some interesting elements to your e-learning courses. Learn to work with 3D models in PowerPoint and bring them into your e-learning courses.
  • Pay attention to some of the subtle audio and visual embellishments that she added to her demo such as the fog, background audio, and the water.
  • In her tutorial, you notice that she added a hover state for the bear signs and then grouped those with transparent shapes to activate the hover state over the entire bear image and not just on the sign. That’s a clever trick.
  • I talk a lot about “touching the screen” as a way to pull people into the course when building interactive e-learning. She has a lot of little things like that, such as getting the bear to roar at the beginning. Explore the ways she gets you to touch the screen.
  • The core quiz slide she built (that she covers in the tutorial) could be stripped of content and be saved as a template for re-use. That’s something to consider whenever building custom interactions: how can it be converted to a template for the next project?
  • The project is visually cohesive and consistent in it’s structure from section to section and in how animations and visual effects are used.
  • When saving 3D videos from PowerPoint to use in Storyline, save them as .WMV and let Storyline convert them to .MP4. Sometimes the last frame seems jagged when using an .MP4 from PowerPoint, but it isn’t the case with .WMV.
  • She didn’t use just the 3D bears. See if you can identify other places where she used 3D.

Check out the Grizzly bear demo. What are some things that stood out to you?


Download the fully revised, free 63-page ebook: The Insider's Guide to Becoming a Rapid E-Learning Pro

Upcoming E-Learning Events

  • We're currently working on locations and dates for 2019.


Free E-Learning Resources

Want to learn more? Check out these articles and free resources in the community.

Here’s a great job board for elearning, instructional design, and training jobs

Participate in the weekly elearning challenges to sharpen your skills

Get your free PowerPoint templates and free graphics & stock images.

Lots of cool elearning examples to check out and find inspiration.

Getting Started? This elearning 101 series and the free e-books will help.


E-learning Example & Tutorial: How to Fight a Bear and Live original post at The Rapid E-Learning Blog
Friday 9 November 2018

Let's Talk About ISDs in eLearning

You will certainly commonly hear them mention analysis if you listen to techies talking. What they remain in fact talking about is Instructional Systems Style (ISD) which is the certain roadmap a company will make use of to guarantee that their workers are fulfilling their performance goals via finding out supplied in formal, informal as well as nonformal networks. Analysis, Layout, Advancement, Application, and Assessment after which the acronym ADDIE forms, are the crucial pillars of any Instructional Equipments Layout process.

Whether you as the end individual requires an Instructional Design is for a educational or corporate feature, there exist two commonly recognized versions to utilize. Both have a number of variants within them and also the very best will depend on an organization's details requirements. Simply put, an organization that makes use of Instructional System Design (ISD) in educating its labor force is able to easily develop the why, where, who, when as well as what of the whole procedure. This methodical technique to training requirements is a constant reminder to those accountable that training programs as well as pertinent assistance products need to always be efficient and effective to meet the demands of an altering landscape.

For many years, the best concern for trainers was to produce courses that fulfill the requirements of the learner. Here are concepts to work with when developing an instructional systems design;
Fail to remember web content as many people have a tendency to broach in training as well as rather, welcome context. The point of view of an audience must dictate the direction of a training initiative. The end goal below is to make sure that people get training that connects to what they are paid to do. Learners take a lot more from an instructor if they utilize examples as well as stories to show their factor. It is only all-natural that humans remember tales more than they do facts-leverage on this connection point. To cover up the procedure of training system design, motivate social eLearning where individuals develop on their own discovering methods without needing to take a seat for hrs to hear it from a person. Learners will certainly appreciate it much more if you set out the fundamentals and afterwards produce circumstances even outside the training area from where they can fill out the gaps.

With Instructional Design, users can utilize activity mapping as a style tool to aid in the recognition of content type that will certainly cater to learners private performance improvement needs.

What they are in fact referring to is (ISD) which is the details roadmap an organization will certainly make use of to guarantee that their workers are fulfilling their efficiency objectives via discovering supplied in official, informal and nonformal networks. Analysis, Style, Growth, Implementation, and also Analysis after which the acronym ADDIE kinds, are the crucial columns of any Instructional Solutions Layout process.

Whether you as the end user needs an Instructional Equipments Layout is for a academic or corporate function, there exist 2 widely acknowledged designs to use.

Tuesday 6 November 2018

3 Reasons to Use Animated GIFs in E-learning

animated gif reasons to use for e-learning

At a recent workshop we discussed the popularity of working animated gifs and how they can be used in e-learning courses. Here are three reasons you can use them in your courses.

Animated Gifs for Novel Visual Design

E-learning courses are still mostly visual. And one part of engaging you learners is to create visually rich experiences. This doesn’t replace instructional design, but it does help make your course look more interesting and contributes to capture the person’s attention.

I love this example created by one of our community managers. She did a great job using animated .gifs to enrich the visuals in her Rise demo. How many animated .gifs do you count in her demo?

animated gif

Click to view the Rise demo.

Speaking of novelty, in the example below I added an animated gif to a slider that represents the module progress. At a certain point, the state of the slide thumb changes from one waling character to another.

animated gif demo

Animated Gifs to Add Humor

One reason animated gifs are so popular is they’re perfect for sharing funny things and memes. And they’re exaggerated with the looping animations. Why not leverage the humor that these offer and work them into your courses? A couple of considerations: many of the gifs probably violate some copyright laws and training isn’t supposed to be funny. Well, maybe it can be funny, but there’s a good chance that regardless of the content someone will complain. If you do use humor, you’ll really want to make sure that it’s appropriate to your audience.

animated demo


Animated Gifs to Show Procedural Steps

The two reasons above are less instructional. This next one fits better with instructional design and training. Use animated gifs to quickly show procedures or steps in a process. If you’re showing steps, it’s good to add some reference points because the content loops and people may not be clear where in the process the steps fall.

Here’s an animated gif that shows the root canal process.

root canal animated gif

Click here to view the animated gif (19 MB)

And here’s a prototype built in PowerPoint that demonstrates showing four steps.

animated gif powerpoint demo

Animated gifs work well for e-learning courses. If you use them in your courses currently, feel free to share ways that they’re used. In the meantime, check out these previous articles on creating animated gifs:


Download the fully revised, free 63-page ebook: The Insider's Guide to Becoming a Rapid E-Learning Pro

Upcoming E-Learning Events


Free E-Learning Resources

Want to learn more? Check out these articles and free resources in the community.

Here’s a great job board for elearning, instructional design, and training jobs

Participate in the weekly elearning challenges to sharpen your skills

Get your free PowerPoint templates and free graphics & stock images.

Lots of cool elearning examples to check out and find inspiration.

Getting Started? This elearning 101 series and the free e-books will help.


3 Reasons to Use Animated GIFs in E-learning original post at The Rapid E-Learning Blog
Tuesday 30 October 2018

Your Branched Scenario Needs to Look Like Something. Is this it?

branched scenario tips

Developing the content and flow of an interactive branched scenarios is one thing. Creating the visual structure is another. In today’s post we’ll look at some key considerations when building scenarios and come up with a simple storyboarding process to help think through the scenario design and layouts.

Branched Scenarios: 3C Model

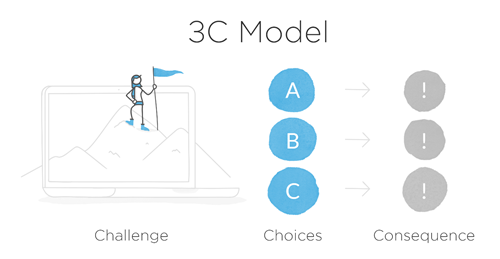
Years ago, I introduced the 3C model to build interactive scenarios: challenge, choices, and consequences. It’s a simple model to help think through the content requirements. It starts with challenging the learner’s understanding through some sort of contextual and real-world situation where decisions need to be made. Give them some choices to make. And the choices produce consequences.

3C model branched scenario

The consequences can be simple with immediate feedback or the 3C model can be compounded where each consequence produces another challenge and branches indefinitely. Of course, it’s hard enough to get your subject matter expert to give you ten good multiple-choice questions, let alone provide all of the content and nuance to build a complex branched interaction. I prefer a simple scenario structure.

Branched Scenarios: Visual Structure

A branched scenario starts with a blank screen. And from there, we add the scenario structure. But what exactly is it that we need and how do we design the screen layouts?

Let’s start with what needs to be on the screen. Here are a few of the main onscreen components that make up many branched scenarios:

  • Background: the background (or environment) is an easy way to establish context. I usually look for a single image that helps do that.
  • Characters: generally speaking there are actors in the scenario. Sometimes they can be implied and don’t need to be onscreen. For example, looking at an email or text message implies that someone in the scenario is viewing it. Or perhaps, the learner is the character. However, in many cases, the scenario actually features characters. Is it one or more? How do you show back and forth conversation?
  • Challenge: the screen consists of some text that presents the situation and challenge. That text needs to go somewhere. Does it go up, down, left or right? Is it there to start, or does it get exposed when the user does something like click a button?
  • Choices: once the challenge is presented, the learner has to make a decision. That usually means there’s an assortment of choices and then some sort of button (or other interaction) to make the selection. Where will that be on the screen?
  • Consequences: each choice usually includes some sort of feedback. It could be all of the feedback or perhaps an alert that the decision has created a new challenge. In either case, how is that displayed?

Branched Scenario: Simplify with a Storyboard

As you review the list above, it becomes apparent that there’s a lot to put on the screen. In workshops we usually create a blank slide and then a box to represent all of those things above. Then we play around with layouts to see what we can get onscreen. After that, we explore different ways to move the content offscreen and use triggered actions to expose the content.

branched scenario layouts

There’s a lot that makes up the scenario layout. The image below represents some common scenario layouts.

Of course, there are all sorts of ways to structure a scenario. Keep in mind not everything needs to go on one screen. You can use layers and lightboxes to expose additional content. Mouseover interactions are great to expand information without requiring that the person leave the current screen.

branched scenario layout ideas

One way to get started is to create three blank slides: one for each part of the 3C model.

  • Challenge slide: set up the scenario by adding visual context and all the supporting text. You’re not writing War and Peace. Keep it short and get right to the point.
  • Choice slide: determine how many choices the person will have. Also determine if you will present ancillary options. For example, you may want some links to talk to team members or contact HR for more assistance. What will those look like, where will they be placed on the screen, and what does the content look like?
  • Consequence slide: what feedback needs to be displayed? Is it just text? Will there be a character?

Once you have the three elements on separate slides, it’s easier to see what you have to expose during the scenario. From there you can begin to assemble the screen. Some people create cheats. For example, create a “folder” that can be placed on a different slide or layer. The folder is a good metaphor and fits a lot of contexts. It’s also a nice visual that can hold a lot of content. It allows you to get rid of character images, buttons and a lot of the other clutter that you have using a single slide.

In a previous post, I simplified the process by suggesting that you use a visual container. The container adds context and holds the text. That’s one option. But there are a lot more. The key is to determine what you need first using the three slides. And then from there play around with ideas on what to add to the screen and what to expose later and when to expose it.


Download the fully revised, free 63-page ebook: The Insider's Guide to Becoming a Rapid E-Learning Pro

Upcoming E-Learning Events


Free E-Learning Resources

Want to learn more? Check out these articles and free resources in the community.

Here’s a great job board for elearning, instructional design, and training jobs

Participate in the weekly elearning challenges to sharpen your skills

Get your free PowerPoint templates and free graphics & stock images.

Lots of cool elearning examples to check out and find inspiration.

Getting Started? This elearning 101 series and the free e-books will help.


Your Branched Scenario Needs to Look Like Something. Is this it? original post at The Rapid E-Learning Blog