Tuesday, 22 January 2019

Free Images for Interactive Scenarios

free images for interactive branched scenarios

Here are some free images for interactive scenarios. They go with the other free images I shared earlier. I use them for practice files in our e-learning workshops where we learn to build interactive, branched scenarios. They’re perfect for your scenario-based training and free to use.

These images are focused on hallways and such and a bit more generic with the white walls.

interactive branched scenario

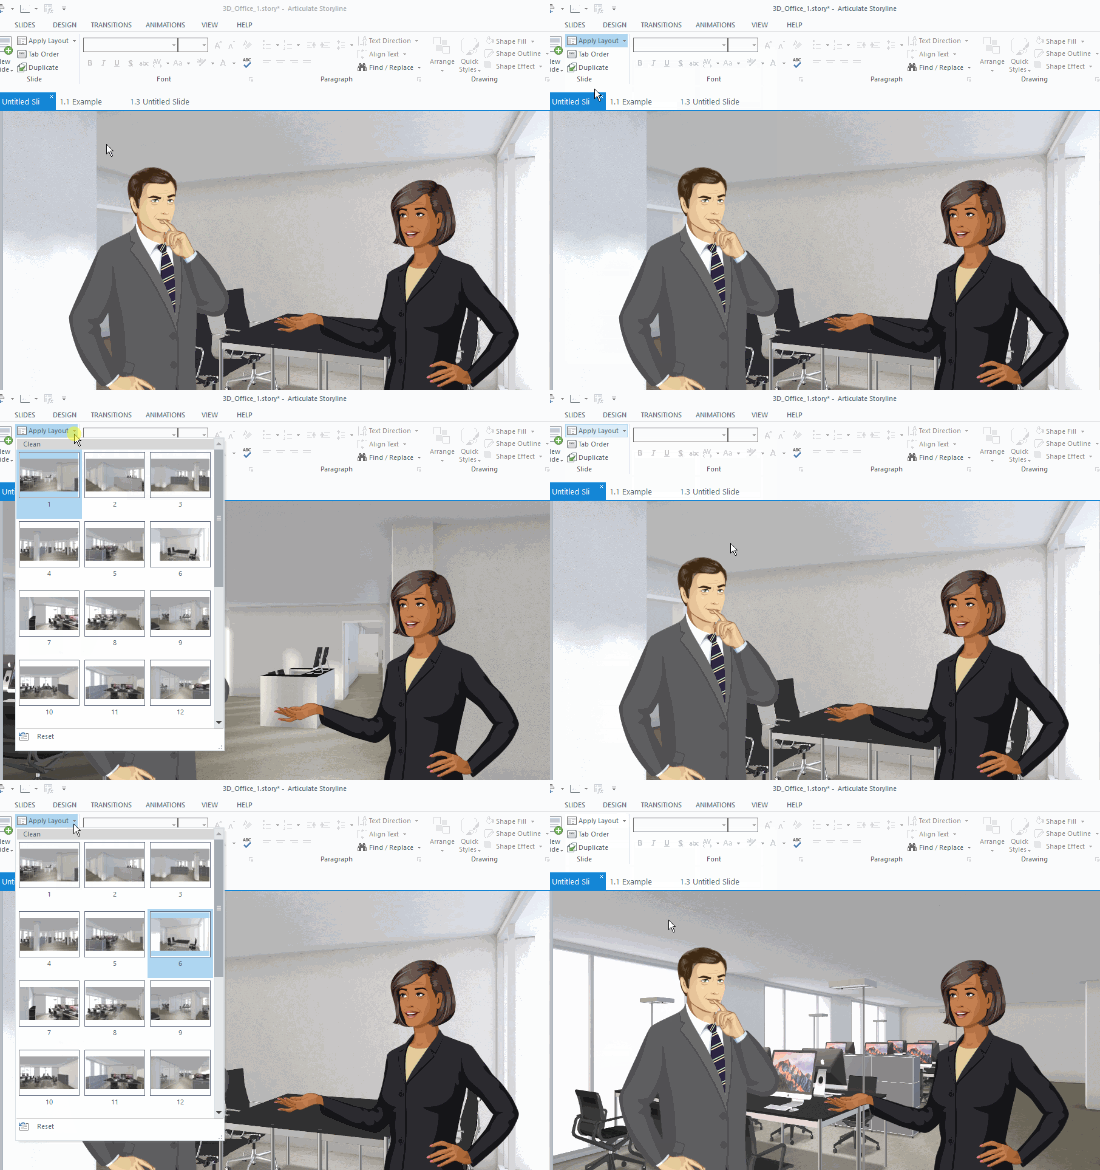
As you can see below, they’re perfect for staging conversations and scenarios and they work great with both the photographic and illustrated characters that come with Articulate 360.

interactive branched scenarios

interactive branched scenario example

As noted in the previous post, one tip is to add all of the images to a single file and then you can dynamically switch the backgrounds as you need. Open the master slide and create a layout for each image. Save the file as a template and you’re all set. Here’s a tutorial that shows how to create templates for reusable interactive scenarios.

how to use interactive branched scenario images

Free Downloads


Download the fully revised, free 63-page ebook: The Insider's Guide to Becoming a Rapid E-Learning Pro

Upcoming E-Learning Events

  • February 13-14 (London): Learning Technologies. Swing by booth H50 and say hello.
  • February 15 (Edinburgh): Articulate User Meeting.
  • We're currently working on additional locations and dates for 2019.


Free E-Learning Resources

Want to learn more? Check out these articles and free resources in the community.

Here’s a great job board for elearning, instructional design, and training jobs

Participate in the weekly elearning challenges to sharpen your skills

Get your free PowerPoint templates and free graphics & stock images.

Lots of cool elearning examples to check out and find inspiration.

Getting Started? This elearning 101 series and the free e-books will help.


Free Images for Interactive Scenarios original post at The Rapid E-Learning Blog

Tuesday, 15 January 2019

How to Transcribe Text into PowerPoint & E-Learning Courses

transcribe text PowerPoint HTML5 Flash

I’ve been playing around with ideas to get old Flash course content into a new HTML5 course. There are tens of thousands of old Flash-based e-learning courses where people no longer have the source files. All they have are published versions of the course and need to convert to HTML5.

Grabbing the media like images, video, and audio is usually not as challenging. But moving all of the text can be a hassle.

In a previous post we discovered how to use screenshots and OCR to extract the text from the old course screens. Another way to get the text into your slide is by reading it out loud to transcribe it and insert into your slide. I like this approach because you it’s easy and you have to go through the content anyway. Reading it out loud may help you think through the tone and some script changes you’ll make in the new HTML5 course.

There are applications you can buy to do the recording and transcription, but I want to focus on tools you already have that won’t cost anything more.

Use PowerPoint to Transcribe Text for HTML5 E-Learning

transcribe text for e-learning with PowerPoint for HTML5 course

The new version of PowerPoint has a dictate feature. All you do is press the button and start to read. PowerPoint transcribes the text and adds it to the slide. Then you make your edits. You can also send the file out to be verified and edited by others who use PowerPoint. Once it’s ready, import the slides into Storyline.

Use Google Docs to Transcribe Text for HTML5 E-Learning

transcribe text for e-learning with Google Docs for HTML5 course

Some of you use Google Docs instead of Microsoft Office. In Google Docs, under the Tools tab, you’ll find a Voice Typing feature. Just press it and it starts to record. If I speak clearly, I find it to be very accurate. Once the text is on the page, send it around to be verified and approved. And then copy and paste it into your HTML 5 course.

Use Windows to Transcribe Text for HTML5 E-Learning

transcribe text for e-learning with Windows for HTML5 course

Microsoft Windows has a transcription feature that works to transcribe text right into Storyline. Press Windows + h keys to open the narration window. Start talking and it will do the transcription. It’s not quite as fast or accurate as the solutions above, but it makes up for it by recording right into the Storyline slide or Rise lesson.

So, there you have it, three easy ways to read the text from old Flash-based courses to get them into your new HTML5 course that you can update and edit as needed. Then publish it for HTML5 and you are all set.


Download the fully revised, free 63-page ebook: The Insider's Guide to Becoming a Rapid E-Learning Pro

Upcoming E-Learning Events

  • February 13-14 (London): Learning Technologies. Swing by booth H50 and say hello.
  • February 15 (Edinburgh): Articulate User Meeting.
  • We're currently working on additional locations and dates for 2019.


Free E-Learning Resources

Want to learn more? Check out these articles and free resources in the community.

Here’s a great job board for elearning, instructional design, and training jobs

Participate in the weekly elearning challenges to sharpen your skills

Get your free PowerPoint templates and free graphics & stock images.

Lots of cool elearning examples to check out and find inspiration.

Getting Started? This elearning 101 series and the free e-books will help.


How to Transcribe Text into PowerPoint & E-Learning Courses original post at The Rapid E-Learning Blog

Tuesday, 8 January 2019

How to Copy Text from Flash Courses When You Don’t have the Original File

convert Flash to HTML5

Many of you have to convert old Flash courses to HTML5. All you have is the published course but not the original source files. It’s easy enough to extract the media (like images and video) from the published output. But adding text from the old course isn’t as easy because most Flash courses don’t allow selecting text to copy and paste. And who wants to spend hours retyping the text?

Here are a couple of simple ways to copy the text from old Flash e-learning courses that you can add to updated HTML5 e-learning courses without having to retype everything. This works whether you’re using Storyline or Rise.

Use OneNote to Convert Text from Image for Flash to HTML5 Courses

Use OneNote OCR to copy text from image for e-learning

Many of you have OneNote. It’s a great application included in the Microsoft Office products. OneNote has a screen capture feature and the option to copy text from the captured image.

  • Play the old Flash-based course and capture screens using OneNote’s screen clipping feature (or insert an image captured from some other application).
  • Right-click on the image to copy text from the picture.
  • Once you have the text copied, paste into your new slide.
  • Watch the tutorial on YouTube.

Use ShareX to Convert Text from Images for Flash to HTML5 Courses

ShareX is free and works great. I use it quite a bit to do screenshots for uploading to various image sites. It also has an OCR feature where it can pull text from an image that can be copied and pasted into a new slide.

OCR e-learning

  • Choose text capture (OCR).
  • Select the course slide.
  • ShareX extracts the text from the image.
  • Copy and paste the text into the new slide.
  • Watch the tutorial on YouTube.

Those are two free to low-cost options to quickly get the text from previous e-learning courses.  Many of you already own OneNote, and if you don’t, you can always use the free ShareX application to do your screen grabs and OCR text conversion. Once you have the text, it’s easy enough to copy and paste it into your new course.

Obviously, this is still a bit tedious, but it is an easy way to get the text from your old e-learning courses when you no longer have the source files or original content.

I hope that helps.


Download the fully revised, free 63-page ebook: The Insider's Guide to Becoming a Rapid E-Learning Pro

Upcoming E-Learning Events

  • We're currently working on locations and dates for 2019.


Free E-Learning Resources

Want to learn more? Check out these articles and free resources in the community.

Here’s a great job board for elearning, instructional design, and training jobs

Participate in the weekly elearning challenges to sharpen your skills

Get your free PowerPoint templates and free graphics & stock images.

Lots of cool elearning examples to check out and find inspiration.

Getting Started? This elearning 101 series and the free e-books will help.


How to Copy Text from Flash Courses When You Don’t have the Original File original post at The Rapid E-Learning Blog

Tuesday, 18 December 2018

How to Convert an E-Learning Course into a PowerPoint File

convert e-learning to PowerPoint

The other day someone asked how to convert their Storyline course into a PowerPoint presentation. PowerPoint and Storyline look similar but they are two separate applications. You can import PowerPoint slides into Storyline, which makes it easy to convert some existing PowerPoint content into an interactive e-learning course. However, PowerPoint doesn’t offer a way to import Storyline files.

With that said, there are some ways to convert your Storyline course content into a format you can bring into PowerPoint.

Setting Expectations for PowerPoint Conversion

One of the reasons people like to convert the Storyline content to PowerPoint is so they have a presentation version of the course that they can share with other presenters. If this is something you need to do, I’ll share a few ideas, but you do need to understand that there are some constraints.

  • Storyline content is usually interactive with triggers showing layers and object state changes. PowerPoint presentations can be interactive, but they tend to be linear presentations of content. So it’s not an apples-to-apples conversion.
  • Whatever you export from Storyline will not be interactive. It’ll either be a video or series of images. That means you can’t isolate text boxes, shapes, or other media to edit on the PowerPoint slides. However, the opposite is true if you want to import your PowerPoint slides into Storyline.
  • You can simulate interactions in PowerPoint with hyperlinks to other slides using hotspots, but you can’t get the type of interactivity you get in Storyline. If you really need to retain the interactive elements, then it probably doesn’t make sense to convert to PowerPoint.

With that clear, let’s review a few ideas for getting your Storyline content into PowerPoint.

Save the Storyline Course as a Video

This is easy to do. Publish the Storyline file as an .MP4. As you can see in the image below, you have a number of resolution and quality settings. Once published the final output will be video.

Storyline to PowerPoint save as video

If you do have interactive elements in your Storyline course, you’ll need to set the triggers in Storyline to account for the change from interactive content to a linear video. That includes triggers that show layers and other objects that aren’t initially visible on the base slide.

As far as PowerPoint, all you need to do is insert the video onto a slide.

Screen Capture the Storyline Course and Save as Images

Open the published course in a browser and do a screen capture of the slides (just the slides and not the player). Here are a few options:

  • Capture the slides individually by going from slide-to-slide. This is a lot slower, but gives you more control when capturing.
  • Capture the course as a video and then output the video as images. Most video editing software has a way to export the video as a series of images. You’ll get an image for each frame. No need to capture at 30 frames per second (fps). I’d capture at a really low frame rate like 2-5 fps so you have less noise when pulling out the images you want.
  • Use a tool like Screen2Gif to create a .gif which consists of images and can usually be output as a series of images. It’s an easy process and the software is free.

Once you have the images you need, insert them into PowerPoint slides.

At that point, you can review the pictures and make edits. For example, where you have interactive instructions like the image below, you either add an interactive element to move to another slide or you add a colored shape to cover the instruction.

Storyline to PowerPoint add hyperlinks

I like working with images better than video because there’s more flexibility. Video gives you a single file, whereas it’s easier to work with multiple images. You have more control over some customization at the slide level and can more easily introduce interactive elements in PowerPoint.

The one thing you can’t get in the conversion is a PowerPoint slide with separated text, pictures, and shapes. It doesn’t work that way. However, if you need the content in a PowerPoint format, the options above should work.

In a follow up post, I’ll show how to make the video interactive and how to add interactive elements to the slide images.


Download the fully revised, free 63-page ebook: The Insider's Guide to Becoming a Rapid E-Learning Pro

Upcoming E-Learning Events

  • We're currently working on locations and dates for 2019.


Free E-Learning Resources

Want to learn more? Check out these articles and free resources in the community.

Here’s a great job board for elearning, instructional design, and training jobs

Participate in the weekly elearning challenges to sharpen your skills

Get your free PowerPoint templates and free graphics & stock images.

Lots of cool elearning examples to check out and find inspiration.

Getting Started? This elearning 101 series and the free e-books will help.


How to Convert an E-Learning Course into a PowerPoint File original post at The Rapid E-Learning Blog

Tuesday, 11 December 2018

What to Know Before Building an E-Learning Course

Before committing resources to your course, it’s important to understand what type of e-learning course you need to build.

E-learning courses tend to be one of two types:

  • Information
  • Performance

Information-based courses are more like explainer courses where the main objective is to share information or offer a linear explanation of the content. This is common for new initiatives where awareness is a key objective to the course. It’s also typical of a lot of compliance training that are less focused on changing behavior and more on awareness of key policies.

I tend to think of these less as courses, and more like awareness marketing content.

Performance based courses focus on changing performance or some sort of behavior. They’re tied to performance metrics where you can measure before and after changes.

When I meet with clients, I always try to determine what type of “course” they want to build. Information-based courses don’t always need to be built because they usually just regurgitate already existing content. So it may be a better option to refer them to existing content than it is to build a course. Performance-based courses usually take longer to build and require more resources.

Types of E-learning Courses

types of e-learning courses

Within that context, there are generally three types of courses:

  • Information: these courses share information with no performance expectations or changes in behavior. They’re more about awareness such as a company’s policy around certain issues.

Performance-based courses tend to be of two types:

  • Procedural: these courses are performance-based as they have a required sequence of events or procedures that need to be followed. This is typical of a lot of machine or software training. There’s not a lot of nuance to the training. There’s ten steps and everyone follows them exactly the same.
  • Principle: these courses are built around decisions that are more soft-skilled in nature. A procedural course has a clear critical path of steps. However, principle-based training is focused on general guidance or principles that are not always black and white. They’re nuanced where the application to each situation may be a bit unique.

Once you understand what type of course you need to build, you’ll be able to commit the appropriate resources. Information/awareness courses require fewer resources. Often, you’re just re-purposing existing content. Which begs the question why you’re building a course (but that’s a different blog post). Performance courses require more focus on measurable objectives, metrics to determine success, and a nuanced understanding of the content and real-world decisions the learner needs to make.


Download the fully revised, free 63-page ebook: The Insider's Guide to Becoming a Rapid E-Learning Pro

Upcoming E-Learning Events

  • We're currently working on locations and dates for 2019.


Free E-Learning Resources

Want to learn more? Check out these articles and free resources in the community.

Here’s a great job board for elearning, instructional design, and training jobs

Participate in the weekly elearning challenges to sharpen your skills

Get your free PowerPoint templates and free graphics & stock images.

Lots of cool elearning examples to check out and find inspiration.

Getting Started? This elearning 101 series and the free e-books will help.


What to Know Before Building an E-Learning Course original post at The Rapid E-Learning Blog

Tuesday, 4 December 2018

Here’s a Free App to Compress Your Images

Squoosh.app is a free service from Google that compresses large images. What I like is being able to compare the before and after versions of images. It’s amazing to see how advanced the compression schemes are today. Some of the images I tested were compressed down over 90% and to the naked eye the degradation was negligible without zooming.

free image compression

As you can see above, the image size goes from 4.4 MB to just under 200 KB. That’s amazing. And the image below shows that the image quality is virtually the same for the naked eye.

You can learn more about the app here. Play around with the app and all of the different settings to see what you can do. Here’s a quick tutorial to see how it works.

Click here to view the tutorial on YouTube.

Final thought:

If you’re using Rise, you don’t really need to worry about compression. Rise will do the work for you. Here’s an example where I inserted the original image (4.4 MB) and the already compressed image (98 KB). In the published output, Rise compressed the original image to 100 KB and as you can see it looks great.

However, if you have a bunch of images to upload, having smaller images may speed up the time it takes to upload your files, especially if you have a slower network connection. Just something to keep in mind.

As a bonus, here’s another site that will do some image compression. And of course, you can always use something like ImageTuner to do batch conversions.


Download the fully revised, free 63-page ebook: The Insider's Guide to Becoming a Rapid E-Learning Pro

Upcoming E-Learning Events

  • We're currently working on locations and dates for 2019.


Free E-Learning Resources

Want to learn more? Check out these articles and free resources in the community.

Here’s a great job board for elearning, instructional design, and training jobs

Participate in the weekly elearning challenges to sharpen your skills

Get your free PowerPoint templates and free graphics & stock images.

Lots of cool elearning examples to check out and find inspiration.

Getting Started? This elearning 101 series and the free e-books will help.


Here’s a Free App to Compress Your Images original post at The Rapid E-Learning Blog